At Red Lodge Mountain we take the safety of our guests and employees very seriously. All skiers and riders are responsible for complying with the Responsibility Code and avoiding collisions with other skiers and riders. Failure to adhere to our resort’s policies and rules can and will result in a suspension or revocation of skiing/riding privileges. Please understand the below policies.
SKIER & BOARDER RESPONSIBILITY CODE
Skiing can be enjoyed in many ways. At ski areas you may see people using alpine, snowboard, telemark, cross country, and other specialized ski equipment, such as that used by disabled or other skiers. Regardless of how you decide to enjoy the slopes, always show courtesy to others and be aware that there are elements of risk in skiing that common sense and personal awareness can help reduce. Observe the code listed below and share this Responsibility Code with others for a great experience on the slopes.
- Always stay in control and be able to stop or avoid other people or objects.
- People ahead of you have the right of way. You must avoid them.
- Stop only where you are visible from above and do not restrict traffic.
- Look uphill and avoid others before starting downhill or entering a trail.
- You must prevent runaway equipment.
- Read and obey all signs, warnings, and hazard markings.
- Keep off all closed trails and out of closed areas.
- You must know how and be able to load, ride, and unload lifts safely. If you need assistance, ask the lift attendant.
- Do not use lifts or terrain when impaired by alcohol or drugs.
- If you are involved in a collision or incident, share your contact information with each other and a ski area employee.
Skiers and riders should be advised that a green circle, blue square, or black diamond trail at one area is not necessarily the same as a similarly rated trail at another area. The system is a relative system that is only valid at this area. Skiers and riders should work their way up, beginning with the easiest trails, no matter what their ability level may be, until they are familiar with the trails at the area.
Be advised that all poles and/or flags, fencing, signage, and padding on equipment or objects, or other forms of marking devices, are used by the ski area to inform you of the presence or location of a potential obstacle or hazard. These markers are no guarantee of your safety and will not protect you from injury. It is part of your responsibility under Your Responsibility Code to avoid all obstacles or hazards, including those that are marked.
Know the Code. It’s Your Responsibility. – WATCH VIDEO
This is a partial list. The full responsibility code can be viewed by expanding the link below.Please be safety conscious, and remember, safety is no accident.
Click Here to View Montana State Law, Section 23-2-736, MCA, DUTIES OF A SKIER.
Montana State Law, Section 23-2-736, MCA, DUTIES OF A SKIER.
- A skier has the duty to ski at all times in a manner that avoids injury to the skier and others and to be aware of the inherent dangers and risks of skiing.
- A skier:
- shall know the range of the skier’s ability and safely ski within the limits of that ability and the skier’s equipment so as to negotiate any section of terrain or ski slope and trail safely and without injury or damage. A skier shall know that the skier’s ability may vary because of ski slope and trail changes caused by weather, grooming changes, or skier use;
- shall maintain control of speed and course so as to prevent injury to the skier or others;
- shall abide by the requirements of the skier responsibility code that is published by the national ski areas association and that is posted as provided in 23-2-733;
- shall obey all posted or other warnings and instructions of the ski area operator; and
- shall read the ski area trail map and must be aware of its contents.
- A person may not:
- place an object in the ski area or on the uphill track of a passenger ropeway that may cause a passenger or skier to fall;
- cross the track of a passenger ropeway except at a designated and approved point; or
- if involved in a skiing accident, depart from the scene of the accident without:
- leaving personal identification; or
- notifying the proper authorities and obtaining assistance when the person knows that a person involved in the accident is in need of medical or other assistance.
- A skier shall accept all legal responsibility for injury or damage of any kind to the extent that the injury or damage results from inherent dangers and risks of skiing. Nothing in this part may be construed to limit a skier’s right to hold another skier legally accountable for damages caused by the other skier.
Montana State Law, Section 23-2-702, DEFINITIONS.
As used in this part, the following definitions apply:
- “Freestyle terrain” means terrain parks and terrain features, including but not limited to jumps, rails, fun boxes, half-pipes, quarter-pipes, and freestyle bump terrain, and any other constructed features.
- “Inherent dangers and risks of skiing” means those dangers or conditions that are part of the sport of skiing, including:
- changing weather conditions;
- snow conditions as they exist or as they may change, including ice, hardpack, powder, packed powder, wind pack, corn snow, crust, slush, cut-up snow, and machine-made snow of any depth or accumulation, including but not limited to any depth or accumulation around or near trees or snowmaking equipment;
- avalanches, except on open, machine-groomed ski trails;
- collisions with natural surface or subsurface conditions, such as bare spots, forest growth, rocks, stumps, streambeds, cliffs, trees, and other natural objects;
- collisions with lift towers, signs, posts, fences, enclosures, hydrants, water pipes, or other artificial structures and their components;
- variations in steepness or terrain, whether natural or the result of slope design, snowmaking, or snow grooming operations, including but not limited to roads, freestyle terrain, ski jumps, catwalks, and other terrain modifications;
- collisions with clearly visible or plainly marked equipment, including but not limited to lift equipment, snowmaking equipment, snow grooming equipment, trail maintenance equipment, and snowmobiles, whether or not the equipment is moving;
- collisions with other skiers;
- the failure of a skier to ski within that skier’s ability;
- skiing in a closed area or skiing outside the ski area boundary as designated on the ski area trail map; and
- restricted visibility caused by snow, wind, fog, sun, or darkness.
- “Passenger” means any person who is being transported or conveyed by a passenger ropeway.
- “Passenger ropeway” means a device used to transport passengers by means of an aerial tramway or lift, surface lift, surface conveyor, or surface tow.
- “Ski area operator” or “operator” means a person, firm, or corporation and its agents and employees having operational and administrative responsibility for ski slopes and trails and improvements.
- “Ski slopes and trails” means those areas designated by the ski area operator to be used by skiers for skiing.
- “Skier” means a person who is using any ski area facility for the purpose of skiing, including but not limited to ski slopes and trails.
- “Skiing” means any activity, including participation in or practice or training for competitions or special events, that involves sliding or jumping on snow or ice while using skis, a snowboard, or any other sliding device.
TRAIL SIGNAGE
The colored symbols on trail signs and trail maps are the keys to enjoying your first few days on the slopes. Their shape and color indicate the difficulty of the trail.
 Here’s what they mean:
- Green Circle: Easier
- Blue Square: More Difficult
- Black Diamond: Most Difficult
- Double-Black Diamond: Most Difficult, use extra caution
- Orange Oval: Freestyle Terrain.
The same trail symbols are used at every resort in the country, but may not be equal from resort to resort. A Green Circle trail at Red Lodge Mountain, might be as tough as a Blue Square at another resort. The trail ratings are consistent within each resort. So, all the “Greens” at Red Lodge Mountain will be about the same difficulty, as will the “Blues” and the “Blacks.”
Skiers and riders should work their way up, beginning with the easiest trails, no matter what their ability level may be, until they are familiar with the trails at the area.
SLOW ZONES
Certain areas of the mountain are designated as SLOW ZONES. Please observe posted slow zone areas by maintaining a speed no faster than the general flow of traffic. Fast and aggressive skiing and riding in these areas may result in loss of lift ticket.
SPEED & COLLISION SAFETY
Red Lodge Mountain is seriously concerned about the safety of its skiers/riders. Ski Patrol will issue warnings or remove privileges without refund for those who are acting recklessly or are out of control.
Three actions every skier and rider can take to help keep themselves and those around safer on the slopes:
- BE READY to slow down or avoid objects or other people at any time.
- STAY ALERT to what’s going on around you, especially other skiers and riders.
- PLAN AHEAD and ease up at blind spots, check uphill when merging onto trails, and give other skiers plenty of room when passing.
Learn more about the Ride Another Day campaign on the National Ski Patrol website: www.nspserves.org
caution
Snowcats, snowmobiles, and snowmaking may be encountered at any time.
Be advised that padding, fencing, marking devices and / or equipment covers used to inform you of a potential hazard or obstacle do not guarantee your safety and will not protect you from injury. It is your responsibility to avoid these areas.
helmets
Helmets are a smart idea. Red Lodge Mountain encourages you to educate yourself on the benefits and limitations of helmets. If you choose to wear one, please ski or ride as if you are not wearing one. Every winter sports participant shares the responsibility for his or her safety and that of others using the ski facilities.Helmets are recommended while skiing and riding.
For more information visit: www.LidsOnKids.org
chair lift safety
Be advised that you cannot board a lift unless you have sufficient physical dexterity, ability, and knowledge to
negotiate or to use such lift safely, or until you have asked for and received information sufficient to enable you to load, ride, and unload the lift safely. You may not use a lift or any ski trail when under the influence of drugs or alcohol. Knowing how to properly use a chairlift is a part of Your Responsibility Code.
TIPS FOR RESPONSIBLE LIFT USE:
It’s YOUR Responsibility to know how to use and ride the lift safely.
GET ON
As a chair passes you at the “Wait Here” sign, move ahead quickly to the “Load Here” sign and line up evenly. When the next chair comes behind you, sit on the seat, and slide back as far as you can – to keep from falling off the chair.
SIT BACK, SIT STILL, HOLD ON
Sit way back to keep from falling from the chair and enjoy the ride to the top! No horsing around, it’s dangerous when you are riding up in the air.
AT THE TOP, PLAN AHEAD TO UNLOAD
At the “Unload Here” sign it is time to get off. Stand up, and ski down the ramp. Watch for others ahead and ski around them. Move out of the way quickly, so others can unload too.
HELPFUL REMINDERS
- Need assistance? Ask the lift attendant for help. Smallest kids should load closest to the attendant.
- Remove & carry packs. Do not use phones, music or games while loading or unloading.
- It is OK to miss a chair and wait for the next one.
- When loading, watch for approaching chair and then sit to the back once seated!
- Drop something? Let it FALL. Any item dropped can be picked up later.
- Absolutely NO horseplay on the lifts!!
CHILD/INFANT CARRIERS
- During winter operations, children loading the lift who are not using approved downhill devices (i.e. skis or snowboards) must be secured in a child/infant-wearing carrier. During summer operations only, children/infants may also be carried onto the lift in the arms of an adult if they are not able to load themselves. They may sit on an adult’s lap or in their own seat.
- Any child carried either uphill or downhill on a chairlift is considered their own person and they count towards total chair capacity. Chairs are not to be filled beyond capacity.
- When using backpack carriers designed to carry a child, one will be asked to remove the pack when riding chairlifts.
- Any child utilizing chairlifts at Red Lodge Mountain, whether in a carrier or using their own equipment, must have their own valid lift ticket. Even if your child is young enough to qualify for the free 5 & Under ticket, they still need a physical lift ticket in order to load the lift. These are available at the ticket office. The only exception is the Magic Carpet, which is free for all guests and does not require a ticket.
- Usage of lifts and participation/observance of activities that take place at Red Lodge Mountain while carrying a child/infant in a wearable carrier is to be performed at the discretion of the wearer of the carrier. Red Lodge Mountain assumes that all who choose to use lifts or participate in/observe activities offered at Red Lodge Mountain while using a child/infant carrier are both physically and mentally able to safely handle the child/infant and the carrier. Keep in mind that risks exist outside the immediate action of the wearer. Participants in activities including other skiers/snowboarders, bike riders, and disc golfers, as well as wildlife, and adverse weather conditions, are just a few examples of risks that are beyond the control of the wearer that may be encountered at Red Lodge Mountain.
- In the event of a lift evacuation, children/infants incapable of being lowered on the evacuation seat create a special rescue situation that will be dealt with on a case-by-case basis. This situation may involve extra risk. Be aware that it is possible your child and/or wearable carrier will need to be belayed to the ground.
- At Red Lodge Mountain, we are proud to allow all members of the family to participate in recreational activities, even if they are too young to do so themselves. Please be smart, safe, and vigilant while using a child carrier at Red Lodge Mountain so that future families can do the same.
TREE WELL & DEEP SNOW SAFETY
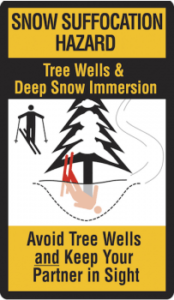
Skiing and snowboarding in deep powder is one of the best parts of our sport. However, if you decide to leave the groomed trails you are voluntarily accepting the risk of a tree well/ snow immersion accident.
A tree well or snow immersion accident occurs when a skier or rider falls – usually headfirst – into an area of deep unconsolidated snow and becomes immobilized. A tree well is a void or depression that forms around the base of a tree can and contain a mix of low hanging branches, loose snow and air. Evergreen trees in particular (fir, hemlock, etc) can have large, deep tree wells that form when low hanging branches block snow from filling in and consolidating around the base of the tree. There is no easy way to identify if a particular tree has a dangerous tree well by sight therefore, treat all tree wells as dangerous.
WHAT TO DO IF YOU GO DOWN
- Yell or use whistle to get your partners attention.
- Do whatever you can to keep your head above the surface of the snow including rolling, grabbing tree branches or the tree trunk. If possible, keep your feet below level of your head.
- If you become immersed, make a space around your face and protect your airway – resist the urge to struggle, it could compromise your airspace and entrap you further.
- Stay calm to conserve air.
- Trust your partner is on their way.
- If possible, use your cell phone to call ski patrol or the resort’s emergency number.
WHAT TO DO IF YOUR PARTNER GOES DOWN
- Don’t leave to get help – Stay with your partner!
- Call for additional resources. Use a whistle or yell for assistance. If possible, call ski patrol.
- Evaluate scene safety for yourself.
- IMMEDIATELY begin snow immersion rescue efforts.
- Go directly for the airway, and keep it clear, be careful not to knock more snow into the hole. Clear any snow from the airway and continue necessary first aid or extrication effort.
- Do not try to pull victim out the way they fell in. Instead, determine where the head is and tunnel in from the side.
- When tunneling directly for the airway be careful not to knock more snow into the hole. Continue expanding the tunnel to the airway until you can extricate the body.
More Information at: www.deepsnowsafety.org/
TERRAIN PARK SAFETY
Freestyle terrain areas are designated with an orange oval and may include jumps, hits, ramps, banks, fun boxes, jibs, rails, half pipes, quarter pipes, snowcross, bump terrain, and other constructed or natural terrain features. PRIOR to using freestyle terrain, you are responsible for familiarizing yourself with freestyle terrain and obeying all instructions, warnings, and signs. Freestyle skills require maintaining control on the ground and in the air.
Use of Freestyle Terrain exposes you to the risk of serious injury or death. Inverted aerials are not recommended. You assume the risk. Freestyle Terrain has designations for size. Start small and work your way up. Designations are relative to this ski area.
BE PARK SMART
- Start Small. Work your way up. Build your skills.
- Make a Plan. Every feature. Every time.
- Always Look before you drop. It is your responsibility to inspect Freestyle Terrain before use and throughout the day. The features vary in size and change due to snow conditions, weather, usage, grooming and time of day. Do not jump blindly. Use a spotter when necessary.
- Respect the features and other users. Only one person on a feature at a time. Wait your turn and call your start. Always clear the landing area quickly.
- Take it Easy. Know your limits. Land on your feet. Do not attempt Freestyle Terrain unless you have sufficient ability and experience to do so safely. You control the degree of difficulty you will encounter in using Freestyle Terrain, both on the ground and in the air.
Read more about Terrain Park Safety at: www.terrainparksafety.org/
BACKCOUNTRY TERRAIN/ACCESS
Backcountry Exit Gates – Use Extreme Caution! You are leaving the ski area and subjecting yourself entirely to all the dangers and responsibilities the backcountry presents. The ski area assumes no responsibility for skiers or riders going beyond the ski area boundary. Areas beyond the ski area boundary are not patrolled or maintained. Avalanches, unmarked obstacles, and other natural hazards exist. Rescue in the backcountry, if available, will be costly and may take time.
Red Lodge Mountain neither encourages nor discourages backcountry touring. Skiers/snowboarders crossing out of the Red Lodge Mountain boundaries do so at their own risk. Read the posted signs at the designated access gates before proceeding.
AVALANCHE SAFETY

Warning: Risk of Avalanche
While snow safety and avalanche mitigation efforts help reduce the risk of avalanches, avalanches and snow slides may occur at ski areas, both inside and outside of the posted
boundaries. Avalanches are an inherent risk of the sport due to the very nature and location of skiing and riding in steep, mountainous terrain.
5 STEPS TO STAY SAFE
- GET THE GEAR
- Always carry a transceiver, probe, and shovel in the backcountry to help you find a buried partner and be found
- Always carry your gear on your body with your transceiver turned on
- Practice with your gear regularly
- Carry the gear and supplies you need to survive an injury or a long evacuation
- GET THE TRAINING
- Take an avalanche class and learn the basics
- Learn how to provide first aid to an injured member of your party
- Keep your skills current
- GET THE FORECAST
- Get the forecast before you go out
- Do the research – be prepared with maps, understanding of the terrain, and reports from others
- Create a plan before you head out
- GET THE PICTURE
- Be aware of hazardous or changing conditions
- Use test slopes
- Be aware of your surroundings, other groups above or below you
- Never intentionally trigger an avalanche unless you are sure the area below is clear
- Identify safer and more hazardous terrain and minimize your exposure
- GET OUT OF HARMS WAY
- Only one person on a suspect slope at a time
- Don’t stop in an area exposed to avalanche hazard
- Stay in contact with one another
- Don’t enter a closed area or any place undergoing mitigation work
- Know what terrain traps are and avoid them
Become educated on how to reduce the risk of injury or death from avalanches through your own action and awareness.
For more information visit: www.avalanche.org and www.kbyg.org

